


Exterior window shutters are taken for granted as an easy to install, quick fix to improve curb appeal.
Unfortunately, few people understand the complexity of window shutters or the correct way of hanging shutters.
What one thinks is a simple mistake will destroy a home’s curb appeal. Don’t let this happen to you!
With historic wood shutters or plastic shutters, there is a LOT you need to know.
Read on and we will insure your success with shutters and curb appeal.
With a photo of your house we can also replace your plastic shutters with real wood shutters to show you the difference and how we can improve the curb appeal of your home.

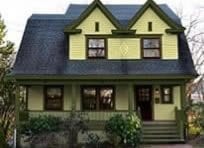
House without exterior window shutters

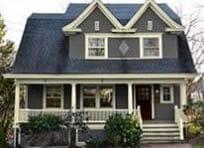
Historic shutters. Operable shutters are now added.
How Exterior Window Shutters Can Ruin the Appearance Of your Home
And What You Can Do to Fix Them
Topics covered:
- The History of Exterior Window Shutters and How They Were Used.
- Window Shutter Mistakes – Exterior Shutters Today vs Historic Shutters.
- Exterior Shutter Hardware – Choosing the right Shutter Hinges.
- Examples of Good versus Bad Window Shutters.
- What Shutter Styles are Right for My House?
- Painting Shutter Colors.
- Purchasing Exterior Window Shutters.
There is a Lot More to Window Shutters Than You Think.
Shutters:
- Make one of the greatest impacts on the appearance of a house.
- Are a feature that is easy to add to your home.
- Provide the most bang for your buck in beautifying your home.
- Can ruin the entire appearance of your house if not done correctly.
Yes, exterior window shutters, just as windows, can be your best friend or worst enemy. Exterior shutters can make or break the appearance of your house. Window shutters are the most abused in about 99% of homes. Yes, exterior window shutters can grossly subtract from a potentially beautiful house and make it look bland and out-right ugly! The good news is that the bad can easily be fixed and allow your house to come alive with beauty. Here we will explain what most homeowners and builders are doing wrong and how easily exterior window shutters can make your house pop with beauty.
The History of Exterior Window Shutters and How They Were Used.
Exterior wood window shutters over the course of history were not only aesthetically pleasing but provided a necessary function with their many uses.
They were used for security, provided privacy from outsiders passing by, added an extra layer of insulation during winter weather (with wood having a high R value) and blocked out the sun, preventing damage to furniture.
Louvered shutters allowed a breeze to enter a home, keeping the room cool on a hot summer day.
Earlier historic shutters were used for security in place of glass windows.
Shutters were either single board, or board-and-batten shutters (vertical wood slats) which were used on cottages and primitive buildings.
Solid raised paneled shutters then appeared and provided a lighter, more elegant look.
Fixed louvered shutters then came into use during the second half of the 18th century.
Historically, solid raised panel shutters were referred to as “shutters” while those with louvered shutters were called “blinds”.
To the right you see a photo of shutters from Thomas Jefferson’s Monticello (1772). Stiles and rails (the edges) on early louvered shutters were quite narrow.
Notice that the shutter is mounted off to the side of the window casing. This mounting style was used only for early shutters such as these.
Many early louvered shutters when closed would not fit snuggly into the window but instead rest against the window sash and stick out from the window.
This window has a separate set of window shutters for both the upper and lower sash.
Through the middle 19th century, most homes would have solid raised panel shutters on the first floor for privacy and security.
On the second floor they would have louvered shutters to allow the breeze to enter during the warm months.
Sometimes the first floor had white shutters. At night when closed a candle lit interior would appear brighter.
Dark colored louvered shutters on the second floor would provide darkness for daytime napping.
An individual window shutter could also combined both features – a raised solid panel on the lower portion and louvers on the top part.
The example to the right shows an 1840’s window.
The shutter on the left is installed graphically from an old sepia-tone photo.
The shutter on the right is planned to be constructed by Shuttercraft to match.
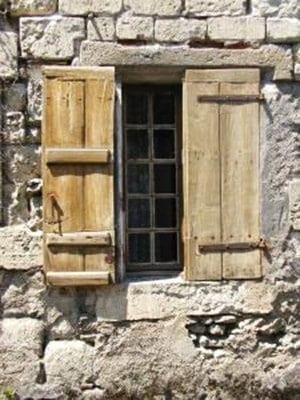
Historic Board and Batten shutters are used for privacy and security.

Raised panel shutters

Thomas Jefferson’s Monticello 1772

1861 Green louver shutters on top floor, white raised panel shutters on first floor. Click to enlarge.

Original c. 1840 shutter from an old photo is pasted on left side of window. Reproduction shutter mockup by Shuttercraft on right.
“Operable Louvered Shutters”, louvers that are regulated by a tilt rod began to be manufactured around 1830-1840. Before this the louvers were fixed in an open position.
With the advent of the exterior Storm Window in the later 1800’s, shutters were sometimes removed and stored away before the cold months and wooden storm windows would be installed. Removal was easy – all you needed to do was lift the shutter off the pin on the hinge.
Exterior window shutters could also remain on the building, left in an open position. If using storm windows, please note that this was all dependent on the type and mounting of the shutter hinge. It is possible that the storm window would not be able to be inserted into the window jamb if a shutter hinge was in the way.
During the warm months, the storm windows would be removed and window shutters would be closed to protect furniture from the sun and allow outside air to cool the house.
At the end of the Civil War, awnings (Preservation Brief #44 – Awnings ) became popular and window screens began to come into use. Screen windows were just like storm windows except they had screens in the wood frame. In addition to these screen windows, adjustable screens (The Adjustable Window Screen Company patent, 1866 ) still sold in hardware stores today, or lace curtains also served the purpose. Visit our page on storm windows and window screens .
In some styles of architecture, exterior shutters also began to fall out of fashion. By the 1920’s, although some exterior window shutters were still used for practical reasons, most were strictly decorative.
Those shutters that were purely decorative however, were still functional or had the appearance of being functional. Homeowners could operate the shutter to cool or insulate the home if they wished. There was no difference to the appearance of the house.
Unfortunately, this changed during the 1950’s with the advent of Aluminum Siding and Aluminum Shutters. This is when the dreadful problem we have today began.
Where Exterior Window Shutters Went Wrong
The public has always been in love with the warm cozy feel of a traditional styled home. Exterior wood window shutters provide that look and feel. Aluminum siding and fake aluminum shutters started to be heavily marketed in the 1950s.
To simplify installation of aluminum shutters on aluminum siding, the method of installing exterior window shutters – hanging shutters changed. Window shutters began to be installed by screwing the shutter onto the siding NEXT TO, instead of directly on top of window casing, and without the use of hinges. This was easy and required minimal intelligence.
Eventually, people became more lazy, less knowledgeable, and more insensitive to the appearance of their windows and began using the wrong size shutters. Before you knew it, they were putting rectangular shutters on arched windows and whatever else you could imagine!
This is where we are today. As you may or may not know, the window shutter has evolved in a grossly unfortunate way. Sadly, we too have evolved to accept this new bland look. It is now normal and what we expect to see when we look at a house with shutters. This is also what architects and builders do and what we see with many exterior window shutter companies.
If you are not aware of the “bad window shutters” problem you soon will be.
Read on and we will re-train your eyes to understand, see, and feel the impact of a architecturally correct and incorrect window shutter.
You will be the expert. We use the term Historic Shutter to represent a visually correct, properly mounted and designed shutter, as all shutters should be, including those used with contemporary architecture.
Mistakes: Exterior Shutters Today vs Historic Shutters –
What is Wrong and What to do Right
The goal of this website is to enable readers to make their house architecturally correct which would then be aesthetically pleasing. I cannot emphasize enough the importance of correct exterior window shutters.
Think of the windows as the eyes of the house and the window shutters as the eyebrows (although to the side) to understand the impact. If the shutters are the wrong type or mounted incorrectly, they can ruin the appearance of the entire house.
Yes, the money you spent on restoring that new front door or painting with authentic Victorian colors will be wasted if your window shutters are incorrectly hung (mounted).
Most people look at exterior window shutters as a decorative feature with no further thought. The decorative shutters are installed and the mission is accomplished. How dreadfully wrong!
The following is what you need to look for and, once you see the difference, you will pick it out every time. There are a number of points you need to understand about exterior window shutters in order to make your house look great.
Louvered Shutters.
On historic louvered shutters (historically called Blinds), the louvers were either Fixed Louvers or Operable Louvers. Each type represents a different period in history and provides a slightly different look.
Fixed Louvered Shutters.
Fixed Louvered shutters are appropriate for buildings built prior to the Civil War. Operable louvered shutters grew popular quickly although fixed louvered shutters remained in builders catalogs into the early 1900’s.
- The louvers are constructed in a fixed open position in order to allow a certain amount of air and light to pass through.
- The louvers must be fixed at an angle in an approximately 60 degree open position. (a completely closed louver would be a flat apx. 10 degrees, perfectly horizontal would be 90 degrees.)
- When the shutter is open the louvers angle pointing downwards towards the house.
- When the shutter is closed, the louvers are angled pointing downwards away from the house to shed water away from the window and block the sun’s rays from entering the room.
There is an important aesthetic benefit with louvered window shutters. The louvers create shadow lines which provide texture and interest. Shadow lines are most important on a house for they create the character that bring buildings to life.
Purchasing a Fixed Louvered shutter with flat closed louvers (10 degrees) as sold in home improvement stores results in a flat artificial appearance due to the lack of shadows.
A historic operable louver shutter with louvers completely closed would never display the flatness fake plastic shutters have. Unfortunately this is the type of shutter you see on all houses today, no matter what the period architecture.
Some shutter companies manufacture quality wood window shutters with louver’s that resemble plastic shutters. Be careful! While the shutters may be well made with quality wood the design is wrong and you will be wasting your money.
Fixed Louvered Shutters:
Have stationary slats in a fixed position apx. 50% open.
The slats are angled downward and inward towards the house.
The louvers provide a nice texture when seen on a house.
Fixed louver shutters were used from mid 18th century through mid 19th century.

Fixed Louver Shutters
Operable louvered shutters:
Have operable louvers that can be adjusted to be opened or closed by a tilt bar.
The slats are angled downward and inward towards the house.
Louvers provide a nice texture and tilt bar adds to the appearance.
Operable louver shutters were installed on buildings from 1830’s-40 through 1950’s.

Operable Louver Shutters
Vinyl Shutters:
Plastic shutters are fake and cheap looking.
There is minimal texture for louvers molded flat against each other in a permanently closed position making them look flat and bland.
A cheap looking shutter provides cheap curb appeal.
Louvers are angled in the wrong direction.
Purchased by homeowners and builders that do not understand shutters and have not read this website.

Cheap Looking Vinyl Shutters
Operable Louvered Shutters
Operable Louvered Shutters were first used around 1830-1840. Operable louvered shutters can be adjusted by a Tilt Rod to regulate air-flow and light. Shutters with operable louvers and a tilt rod create a shadow pattern providing the best depth, contrast, and character.
If your goal is decorative window shutters they must still appear as if they are operable. A “fake” plastic shutter from a home improvement store has louvers that are fixed in a tightly closed position than they normally would be if they were to actually operate. The amount of space opened would not need to be as great as 50 percent as Fixed Louvered shutters (as explained above), but should NOT be totally flat either in order to look real.
If your house was constructed after the Civil War, there should be a tilt rod on your window shutters. This is an important feature that is always overlooked and greatly affects its appearance. In this case a false Tilt Rod should be attached to fixed shutters to appear operable. Failure to achieve this look will greatly sacrifice the appearance of the house.
When historic shutters are in the closed position, the louvers should be angled pointing downward and away from the house to shed water away from the window it is covering.
When shutters are in an open position, the louvers will be angled pointing downwards toward the house. Water will be shed to the back of the shutter towards the house; but, no need to worry, there will be air space from the hinge offset for runoff and drying.
Shutter Size Errors
Another mistake which is almost always made, is improper shutter height and width. The width of each shutter must equal half the size of the INSIDE of the window casing. If both shutters were to close they must sit inside and fill the window casing, covering the entire window in both height and width. Although you may never close the shutters, this is just as important when decorative shutters are in an open position.

Closed shutters.
Two properly sized shutters must fit inside and fill the window casing when closed
When you look at a window, your mind interprets it as a shape. When there are two shutters (right and left), which are sized correctly, they represent two-halves of that shape (the window opening). Your mind recognizes this, and interprets this equal balance as appealing. Sadly, most people ignore this and are probably busy thinking about watching I Love Lucy re-runs, instead of taking the time to respond to their natural inner senses.

Shutters are too narrow to fill window when closed and too long – notice the bottom of shutters extend to the window sill.

Shutters are too wide and too long.

These shutters are the perfect size for two different types of windows. Don’t be distracted by the unattractive imitation-brick asphalt siding, which began production in 1931.
Shape Errors
Common sense will tell you that shutters must also match the shape of the window. Many times you will see a beautifully arched window with a rectangular shutter. Your mind is working overtime interpreting these two different shapes and why are they grouped together. Much can be learned by the child’s toy which requires the correctly shaped block to be inserted into the correspondingly shaped hole. As you see many homeowners never succeeded with this toy.
Rectangular Shutters on Arched Windows

WRONG

WRONG
In the two pictures above, not only are the shutters the wrong shape, they are also fake, too long for the window, and mounted incorrectly. Just because you pay someone with years of experience to install shutters, doesn’t mean that they will do it correctly. This injustice has already reached epidemic proportions.
Shutter Hanging (Mounting) Errors
Probably the most prevalent mistake made is improper shutter installation. This makes a beautiful house look cheap, ugly, and bland. Sadly almost all shutters are mounted this way and the public has evolved to accept this look. There are two parts to this error.
The first part of the mistake is that shutters mounted directly on the facade/siding of the house, appear banished off to the side of the window as if the window wants no part of the shutter. Visually, it MUST appear as if the shutters are mounted directly ON TOP OF the window casing, next to the window opening. Failure to do this looks ridiculous and drastically changes the appearance of the entire house. You are confusing your subconscious mind as it tries to interpret patterns and make associations. What is this rectangular shape doing all by itself out there?
Another common mistake is mounting the shutters flat against the house. Here you lose your shadow lines which result in a bland, uninteresting house. When shutters are mounted directly to the face of a house, there is no room for ventilation between the shutter and the house. This results in heat build up from the sun that can cause damage to siding and painted finishes behind the shutter. A correctly mounted shutter should APPEAR to be attached to a hinge, protruding from the house.
There are a few technicalities in properly mounting shutters depending on your window and the type of hinge used. However, the shutters should still have the same appearance as in the examples of GOOD Shutters on this page. When open, shutters should be located tight to the window covering all or part of the window casing and projecting outward at the window edge.
Architecturally, it is not necessary for a feature to actually be functional; however, it must always appear functional. Please understand, I think it is wonderful to have historic, functioning shutters, but the goal here is appearance. That said, you may not need or want your shutters to open and close, but they MUST appear as if they do. This is explained more in the next section on Exterior Shutter Hinges.

Exterior Shutter Hinges
Historic shutters were mounted on hinges. There are two parts to a shutter hinge. One part is attached to the house and the other part is attached to the shutter. The part of the shutter hinge that is attached to the house contains a Pintle – a pivot point for the shutter hinge to rest on. This part of the hinge can either be mounted to the house on the face of the window casing OR on the inside edge (jamb) of the window. Each of the two mounting types provides a different appearance.
There are many types and sizes of shutter hinges you can use. A lot depends on your window and how much space you have to mount the hinge. These details and customizations you should discuss with the shutter manufacturer. Here, on OldHouseGuy.com, you will learn what you need to know to get the proper look.
If you think your house originally had shutters, you can check to see where the original hinges were mounted by looking for “ghost marks”. Even after years of painting, you should still be able to see these marks. You may even see them in both places (edge and face) – this means your shutters and/or hinges were replaced. Most likely, old face-mounted strap hinges were replaced in the late 19th century with newer hinges mounted on the inside edge.
Shutter Hinge Throw – distance from window opening
One of the most important things to understand when ordering shutter hinges is a term called “THROW”. This is the space between the pivot point of the hinge and the inside edge of the shutter when the shutter is open.
This is very important because if there is a large THROW, or large swing, there will be more space between the shutter and the hinge pivot point. In other words, the shutter will be farther to the side, away from the window opening, exposing more of the window casing. This large THROW will make your wonderful historic shutters appear just like all the fake plastic shutters you see mounted off to the side of the window.
As I stated earlier, each window is different and there does need to be some THROW for your shutter to work. Do not get a hinge with a larger throw merely for the purpose of being able to see the wood casing. Sadly, this is becoming the standard of the best quality shutter manufacturers. And why? Because the consumer is accustomed to the wrong look and that is what they want to buy.
Below are examples of shutter throw and the type of shutter hinge used to get the right look.

Correct: Shutter Throw is tight to window using a Jamb mounted Butt hinge.
Here the shutter is tight to the window because a Jamb hinge (Butt hinge) is used. This look is correct for a house built 1854 to present. It is also correct for shutters using surface hinges after 1854.

Correct: Shutter throw is not as tight to window using Surface Mounted Hinges.
This shutter is off to the side because the hinge is mounted on the surface of the window casing. This look is correct for a house built before 1852. It is also correct for a shutter with surface hinges after 1852.

Correct for 18th century and early 19th century only. Casing should not be exposed with a wide throw otherwise.

WRONG: A shutter should never be mounted this way.
NEVER mount a shutter this way on any house. This is where homeowners, builders, and architects fail today.
Shutter Hinge Offset & Standoff
Exterior shutter hinge offset and stand off is the distance a shutter projects from facade and angle of shutter
I think it is wonderful to have operable shutters but there are technicalities specific to your windows that you should discuss with the shutter manufacturer. My objective on OldHouseGuy.com is to educate you on how your home can have the best appearance. Once this is understood, and if you prefer operable shutters instead of merely decorative, the next step of mechanics can be addressed with the manufacturer.
This information is important even if your shutters are strictly decorative. The next thing you need to understand is the term hinge OFFSET. OFFSET and STANDOFF are important terms in assuring your shutters will not only look good, but also open and close properly. These terms are sometimes used interchangeably.
The Offset and Standoff of the hinge pertains to the part of the hinge that is attached to the house. This part of the hinge has a point or Pintle – a pivot point where the shutter is connected.
The Offset we will discuss here is the distance the hinge extends your shutters AWAY from the window casing. An OFFSET of about 1/2 to 1.5 inches is usually recommended, although each window casing is different.
The Offset is important because the space provides necessary ventilation behind the shutter and creates additional shadow lines which make your house come alive with interest. Shutters you see today are flat against both the window casement and the facade, without shadows, making the house look bland.
The outer edge – opposite edge of the shutter, away from the Offset hinge, should rest closer to the facade of the house. The fully opened shutter can be secured with a Tie-Back attached to this outer edge (without this Tie-Back your shutters will flap in the breeze). The final result will be a shutter that is angled in appearance.

Shutter offset showing angle.
Shutter Hinges – Which Type to Choose
There are two basic types of hinges: Edge Mounted and Surface Mounted.
Edge Mounted Shutter Hinges (Jamb Hinge)
Edge Mounted Shutter Hinges are also referred to as Jamb Hinges or Butt Hinges. These hinges are mounted to the Window Jamb – the inside edge of the window casing. Hinge mounting depends on your window construction since the window jamb needs sufficient space to attach the hinge. These hinges are mortised into the wood casing and the shutter. For an example of an edge-mounted hinge, just take a look at how a door hinge is mortised. The Acme Lull & Porter hinge was a very popular edge mounted hinge in the later half of the 19th century and after. They were self-locking, meaning when in an open-position, they locked in place, eliminating the need for Tie Backs. The Acme Lull & Porter hinge was Patented in 1854. Click here to see 1854 patent .

Surface mounted shutter hinge. Hinge throw is about 1 inch from window casing to allow space for pintle. Window casing is partially visible. 1830 – present.

Jamb mounted shutter hinge. Shutter covers window casing. Hinge is mortised into edge of casing. 1854 – present.
Surface Mounted Shutter Hinges
Surface Mounted Hinges are also referred to as Strap Hinges. These hinges are mounted to the FACE of the window casing. These hinges are not mortised into the wood. Strap Hinges are more visible due to the strap supporting the shutter. These shutters also provide a different appearance. Since the hinge is attached to the face of the casing, the pivot point can be no less than about an inch from the edge of the window opening. This results in a slightly greater Throw than Edge Mounted hinges since the point of origin is a bit farther away from the window edge. Surface mounted hinges were most popular on structures built before the Civil War.
Remember with whatever type of hinge you use, try to keep the shutter as tight to the window as possible unless your house dates back to very early 1800’s or earlier.
Surface Mounted Hinges for Recessed Windows (usually brick or stone houses)
There is a difference when mounting a shutter on a wood sided house compared to that of a house sided with Brick or Stone. The window is constructed the same but instead of being surrounded by a wide casing, the window is surrounded by a brick molding which is narrower than a casing.
On a WOOD sided house, the siding does not project beyond the face of the window casing. Surface Mounted or Edge Mounted hinges can be used and the offset needed is minimal.
On a BRICK or STONE sided house, the brick or stone projects beyond the face of the window casing. The window and casing are recessed. Here, a surface Mounted hinge MUST be used and, depending on how deep the casing is recessed, a greater OFFSET will be required. This will allow the shutter to clear the brick/stone siding when swung open (if operable) or fixed in an open position.

Surface hinge is attached to face of brick mold. Offset extends shutter to face of bricks.
Shutter Tie-Backs
A Tie-Back on a shutter is usually referred to as a Shutter Dog or Shutter Catch. A Shutter Dog holds the shutter in place from the front. Since it is visible, there are many decorative Dogs to choose from.
A Bullet Shutter Catch or Acorn Clip is a pin that holds the shutter in place from behind. This is not visible when the shutter is in an open position.

Shutter Dogs

Acorn Clip
Other Shutter Hardware
There is a large selection of shutter hardware to choose from as you will see on the recommended shutter sites. There are locks, bolts, pulls, tie-backs, etc. These items will add additional visual interest to your shutters and house.
Examples of Good vs Bad Window Shutters

BAD: Shutters are mounted to sides of window and flat against siding. They look flat and cheap. No shadows.

Good: Shutters are mounted on hinges on the window casing providing the appearance of being able to close. Depth and details are obvious.

Bad: Fake plastic shutters. Better to have nothing.

Good: Historic wood operable louver shutter.

Cheap rectangular shutters. Better to have no shutters.
The following photos are all from the same house. I guess the owner was either confused or had a short attention span because the shutters are hung three different ways. There are many windows on this house. Some are correct, but most are wrong.
Hightstown NJ, is a very preservation minded town with some great buildings. Unfortunately, this house is the exception looking like a clown house with its drunken mixed up shutters.
First to the right we have a perfectly hung shutter.
Wood arched shutters with operable louvers.
The shutters on this window are installed backwards.
If the shutters were to close they would not fit into the arched shape of the window.
Here is another ridiculous looking window.
Rectangular shutters that are too tall on an arched window.
One would question the integrity of this homeowner.

Good: Arched shutters mounted correctly.

Bad: Arched shutters are hung backwards.

Bad: Rectangular shutters on arched window. Wrong size.

Bad: Wood operable louver shutters are mounted wrong making them look plastic. They are also the wrong size.

Perfect shutters. These shutters are similar to those on the left except they are mounted correctly. Notice the detail shadows make.

Bad: The perfect Board and Batten shutter for the deranged homeowner.

Good: This is a perfect Board and Batten shutter from the 1920’s.
Board and Batten shutters are the oldest type of shutters.
Use them on an 18th century cottage home.
They made their comeback in the 1920’s with cutouts designs.
NEVER EVER should they have spaces between the boards.
Homes with these shutters do not belong on this planet.
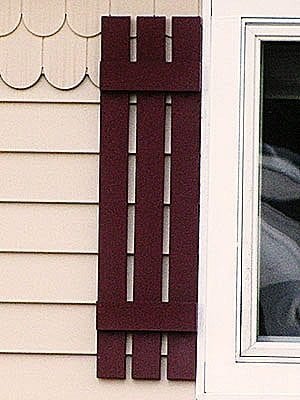
Never should there be spaces between the boards.

Bad: Painted shutters are the wrong size and in the wrong location. Shadows were not painted.

Bad: Just when you think you saw it all. Glass shutter insanity. Where do these people come from?

Bad: Guess the homeowner doesn’t know this is a garage. What’s next – shutters on a chimney?

Bad: Backwards arched shutters on square window.

Shutter insanity. Look closely. The homeowner attached shutter tops to make bunny ears. I’m more curious to see what the homeowners look like.

These shutters are so wrong that the town put up a sign about them. The sided bay looks like a wart on this house and the shutters look like ears.
There is an epidemic of contractors AND homeowners destroying the character of homes as seen in the above examples. This incorrect way is now the standard! If shutters cannot be mounted properly, a house would be better without any at all; otherwise, they can ruin a house and even the neighborhood. As you drive down the street, begin paying attention to shutters and you will now see the difference.
Window Shutter Options
Give up? Don’t want to buy new exterior wood shutters?
Check out some Optional Mounting and Shortcuts for Vinyl Shutters
By now you should thoroughly understand the correct and ideal way to mount shutters is to use hinges even if you plan to only use your shutters as decoration. There is one option, or should I say a trick, to be used only as a last resort. I only provide this information to those who will not purchase hinges as advised, in my effort to reduce the number of ugly houses.
Even if you have a vinyl sided home, with vinyl shutters, and have no intention on replacing them, you can still achieve a more authentic look.
Screw two, 1-inch thick blocks of wood on each side of the window casing near the opening where the hinge would normally be. You may need to shave off the outside corners of the blocks. Take the shutter and screw it to the blocks of wood on the window side, and the other end of the shutter directly to the facade of the house. This will result in an angled shutter – creating additional shadows – resulting in a much much better looking home.
Another shortcut is attaching a false tilt rod. Purchase a wooden dowel, paint it and attach it to your louvered shutters with a liquid nails adhesive.
Shutters for Other Types of Windows and Spaces
Depending on the style of your house, each window does not have to be shuttered. This is determined mostly by architectural design and window style. For example, on a Queen Anne style house, windows in a tower may or may not be shuttered. Larger ornate or smaller sized windows can be left without shutters or may only need one shutter on one side of the window (fit to cover the entire window).
Think in terms of shutter use.
1.) Back in the day, would it have been practical or useful to have shutters on this window?
2.) If not useful, would it provide balance in design or match another window with shutters? Colonial style architecture is symmetrical and you need to maintain this symmetry.
A Ganged window is two windows side by side separated by a mullion (a vertical piece of wood separating the windows – part of casing). In this situation, you have a few choices (not in any order), but first look for ghost marks of earlier hinges. If the window had shutters there would be ghost marks of hinges visible.
- Attach a large (double size) shutter, the size of the window on each end.
- Mount double shutters at each end. The shutters would appear single, but actually are two hinged shutters, folded over. The shutter will close from one side for each of the two windows. The visual effect of patterns will not be disturbed.
- Mount four shutters in the manner you would normally if the window were not Ganged. Since there is minimal space at the mullion between the two windows, the shutters will remain in a semi-opened position and held in place with a tie-back attached to the sill, extended out to the shutter. I have seen this method in original 19th century design plans. If you find ghost lines, you have your answer.
There will be other situations where a window is next to a down-spout or a wall of a house where the shutter will not be able to be parallel to the house when open. Do not omit the shutter.
Here are some examples:
Unless noted all examples are historically correct.

Double shutters for wide or ganged windows. Use these instead of mounting shutters in the center between the windows. These shutters do not fold.

Non folding wide shutters with operable louvers at the bottom.

Double folding panel shutters in open position. Notice the hinges giving you the option of hanging them full or folded. An option for double or wider windows.

Double folding shutters shown in folded position. Double shutters are folded in half.

Side view showing folded shutter. Face mounted hinges. See Acorn snap at bottom to hold shutters together.

These shutters are on a bank. They are way too wide to be single shutters. They must be folding to avoid looking dumb. Additionally they are mounted incorrectly to the face of the brick instead of the brick mold which is probably too narrow anyway.

Center bay window is wider and has double shutters that do not fold but overlap.

Operable shutters being used on a hot day.

The way to attach shutters when windows are too close.

How to mount shutters in tight places.

Shutters can still be installed on a bay window.

Overlapping shutters on 18th century house.
What Shutter Styles are Right for My House?
Look at old photos. If you don’t have any, look around your neighborhood for similar houses and see the kind they have. You can usually tell if the shutters are original. Keep in mind that your house may have been built in 1800 and the shutters replaced in 1900 with a style popular at that time. Shutter styles and hardware are also regional. You can contact your local Preservation Commission if you have one although I doubt if any of them could provide any help. Try them anyway; if not, call a Preservation Architect and ask for a recommendation. Your State Historic Preservation Office will have a listing of qualified Preservation Architects and consultants.
Many buildings before 1750 had exterior shutters. During this time and through the mid 1800’s interior shutters were common. Some homes had both interior and exterior shutters. Some early homes that only had interior shutters, later added exterior shutters.
Board and Batten shutters and Raised Panel shutters were used during the 18th century and into the 19th century. Strap Hinges were used and Rat-tail style tie-backs were most popular. Note that Board and Batten shutters do NOT have spaces between the boards like those made today. Board and Batten shutters varied, some with tongue-and-groove planks. These shutters were used on cottages and more primitive structures while raised panel shutters appeared on more refined structures.
At the end of the 18th century louvered shutters began to gain in popularity. Up to the Civil War, homes had raised paneled shutters on the first floor for privacy and security, but did not have any shutters on the 2nd floor. Louvered shutters were often added to the 2nd floor as a later addition.
Around 1800-1830, Butt hinges came into use but were not popular since they broke easily. Strap Hinges were the most popular. Tie-backs rods were mounted on the sill. Most styles were dependent on what the local blacksmith produced. Operable Louvered shutters began being manufactured 1830-1840.
At the time of the American Civil War, the Industrial Revolution was in full swing and steel suddenly became less expensive. Acme Lull & Porter, Butt and “H” Style hinges were being produced and became popular, although Strap hinges were still available. “L” shaped surface mounted hinges came about in the late 19th century.
The Acme Lull & Porter hinge was actually patented in 1854. Click here for patent details .
From what I have seen in the New Jersey area, most Victorian and Colonial Revival houses have Edge Mounted Acme Lull & Porter hinges with operable louvered shutters. This is the same for pre-Civil War architecture, but in this case, probably, because their original strap hinges were replaced with the more contemporary and popular hinges of Victorian times. Unfortunately today, shutter manufacturers are selling Surface mounted hinges for every type of architecture. Please be aware of this.
“S” style Shutter Dogs were mass produced in 1930’s. They should be used only on houses built during or after this period only. Early 20th century architecture such as Arts and Crafts, Bungalow, and Foursquare homes were usually without shutters.
From 1915 through the 1920’s, Colonial and Cottage style homes had mostly solid panel shutters with cut-out designs. Louvered and the rustic Board & Batten shutters were also used occasionally. Although rare on Arts & Crafts homes, If Bungalow and Four-Square homes had shutters, they were usually solid panel with cut-out designs or half-louvered.
Here are some shutters from the 1920’s period.

1920’s panel shutter with cut out on first floor.

Black half panel with cut out and fixed louvers on the 2nd floor.
I was surprised to see a 1920’s Colonial house following the format of an early 18th century house. This house has paneled shutters on the first floor and louvered on the second floor.

Fixed louvered shutters.

Operable louvered shutters with tilt bar.

1920’s Board and Batten shutter with cutout.

Never have spaces between boards.
Board and Batten shutters from the 18th century would not have the decorative cutouts. Those with cutouts are from the 1920’s. All Board and Batten shutters would have either cross bracing as in the photos above or “Z” bracing.
Wood Window Shutters Maintenance – Keeping your Shutters Out of the Landfill.
If you have your original shutters, treat them as if they were gold. Just because they’re rotted does NOT mean they cannot be repaired. Use a high quality exterior wood filler for rotted wood (not bondo).
Keep them painted. If the louvers are operable, be cautions of paint buildup. When you have your house painted, the painters will probably offer to replace your real shutters free of charge with fake vinyl shutters. This is easier for them than scraping, repairing, and painting the original ones. Don’t depend on painters or contractors to mount them properly – almost 100% are ignorant when it comes to this. The result is more harm than good. You are now the expert and must instruct them.
There are not many places that make shutters today and they’re very expensive; so, maintain your shutters, protect your investment, preserve history, and let your house shine with character.
I also suggest attaching a copper or painted metal cap using an adhesive to the top of the shutters for water protection.
Going Green – Back to Basics to Protect the Environment
“R” value for a glass window is about an R-1 rating. A piece of solid wood 1 1/8 inch thick is R-1.755. A closed wood shutter will therefore provide approximately R-2.78 of insulation. Add an interior storm window for additional insulation.
Non-Wooden Shutters
After all you learned so far, a vinyl or aluminum shutter doesn’t even qualify as a shutter. However, we all need to be more conscious of our planet and our forests and the depletion of our natural resources. Remember (wood shutter owners), it is better to maintain and repair than replace. There are many new man-made products being invented to replace the use of wood. However, they must be indistinguishable from the product they replace at an arm’s distance.
Painting Shutter Colors.
By far the most popular color for shutters throughout history is dark green – Benjamin Moore, Essex Green, Gloss to be exact. Secondary colors were black or a red color. Darker shades were favored to continue the visual concept of the window void when shutters are closed.
Purchasing Exterior Window Shutters.
Ok, you now know how a shutter should look on a house. You also know how important this is. With what you know, it is up to you to articulate what you want to the shutter salesperson.
Remember, LET THE BUYER BEWARE. DO NOT assume that since you’re paying a lot of money, and buying from a recommended shutter manufacturer that specializes in Historic Buildings, you can be assured you will get Shutters and Hardware that will make your home look as it did 100 years ago. There are some good manufacturers out there that produce historically accurate shutters and hardware. You still need to order the right products to get the look you want. Use the wrong hardware to hang them and you just wasted your money. Your house does NOT have to be historic. If your house was just built, the same rules above apply – it’s all about making your house look the best it can.
Remember, mounting shutters to the side of the window frame is wrong. For buildings constructed prior to the Civil War when Strap Hinges were used, some of the casing may be visible due to the Pintle being mounted more centered on the face of the casing.
People are accustomed to seeing improperly hung shutters. They are accustomed to seeing the trim around the window not being covered up by a shutter. Manufacturers are catering to this demand of the public and are offering them what they want. Don’t worry! You CAN still get the look you want by being an educated customer.
Shop around for shutters. Check their websites and get their brochures. Look at their sample photos. Do they look like original shutters or fake? Your eyes are educated now. Sadly, many of the sample photos in brochures I have seen look fake due to the type of hinges used. Don’t let this stop you, they should still carry the hinges you need.
Next, read every page of the sites I list below. Compare the dimensions, rail height, type of wood, and all the types of hardware available on each site.
Next, print out one of the shutter measurement guides and hardware worksheets available on the manufacturer’s websites. Physically examine your window frame on the exterior and plot the dimensions.
Congratulations, you are now ready to call a few manufacturers and explain:
- What shutter style you want.
- If it will be a working shutter, additional specifications and options such as rabbeted edge, and working louvers, faux or working tilt rods, etc.
- The appearance you want – how you want the shutter hung. They will then advise you on hardware to get that look. You will need a diagram/worksheet while discussing this.
Once you receive your new shutters, install one as a test. If you are not happy with how it looks or operates, you will need to exchange the hardware.
I hope this information has helped you. The purpose of this site is to educate you and guide you in making a purchase that will make your home look as authentic as possible. Please let me know if you think anything should be added or may need a better explanation.