


Did you ever wonder what paint colors your house had (interior/exterior) was when it was built?
Did you know about or ever consider doing a Paint Analysis?
Whether your house is from 1850 or 1950, your house has been painted periodically to reflect the paint colors that were available and popular at the time.
These many layers of paint tell a history.
Paint Analysis is the way to discover the history of your house based on the colors it was painted.
This is a very involved process using very expensive equipment but can also be a DIY project.

Paint analysis is a very complicated scientific process although there is a quick DIY method.
Why is Paint Analysis Important?
If your house is on the historic register or may someday have the possibility of being on it, paint analysis must be considered. Such a building can have historic significance in the town being a home of the mayor, a house built during a local housing boom, or even a popular general store. Paint analysis can play an important part in understanding and documenting the history of the building, and also in restoration now or in the future.
Your house does not need to be Mount Vernon or a special house to qualify for paint analysis. It can be just a run of the mill 1950’s Ranch house with a homeowner that is interested in its history. (1950’s Ranch houses are now considered historic homes)
Here we will discuss two types of paint analysis: one for the average homeowner who would like to do it themselves and one for a significant building that requires a trained specialist.
Professional Paint Analysis
This is the best option if you want the best results. Aside from a “significant” building, I recommend it for all buildings pre-1850. Why? Because these buildings are more rare and will eventually be considered significant enough for a Historic Register listing.
First numerous samples are taken from the interior and exterior of the house by a professional or by the homeowner. These samples are taken or mailed to a laboratory for a scientific analysis along with a report. There is a lot more to it with additional pieces of the puzzle used such as the region, status of the residents, and history that helps to put the picture together.
A trained specialist will work with each sample using expensive equipment to magnify the paint chip. Faded paint, layers of primer, and certain old paint formulas must be considered. Colors can change once covered with a new layer of paint creating a different color. Faux graining can also be in the history. This process can be quite expensive but the results can be very interesting of how the colors, both interior and exterior have changed with the styles over the years. Unfortunately the number of qualified researchers are few.

Magnified layers of chips of paint. So beautiful – I really love this image. Credit to my friend Annabelle of Historic Building Architects who I had the pleasure of working with on historic projects.
See how Professional Paint Analysis is performed in the video below.
DIY Paint Analysis
For the homeowner that would like to know what colors were on their house without hiring a professional, there is an easy way to do it yourself. Although not accurate, some information is still good. The results can also show the color placement to see if your window casing matched the window sash for example.
Every time paint is applied it creates a build-up of layers. Each layer can be a paint color, a primer, or even a layer of dirt. Be aware that paint is NOT a stable material. You can not just scrape an area and find the original color as it appeared since paint undergoes a radical change over time. A professional analyst is able to recognize these changes to avoid false results. However, this DIY method is still a good step to better understand what colors were there.
How to Do a Paint Analysis Yourself.
This quick method permits layers to be counted with only a hand magnifier.
Tools Needed:
- X-acto knife
- Illuminated magnifier (magnifying glass and a portable light)
- 220 grit wet/dry sandpaper
- 600 grit wet/dry sandpaper
- lubricating oil.
Find an area where it is least likely that the paint has weathered and chipped off. Under a window sill, under the eaves where the paint is protected, porch area, etc. You get what I mean.
First a shallow, dished scalpel cut is made through the layers as shown in Figure 1. This cut need not be larger than ½ inch to 1 inch across. Angle the blade knife so you will create a slightly dished edge that will expose all the surviving layers down to the wood.

Figure 1. First angled cut to expose paint layers.
Next wet the exposed layers liberally with lubricating oil. With a circular motion sand the layers smooth with 200 grit wet/dry sandpaper. Sand the sides of the crater to a smooth, gradual slope to create a dish that will look like tree rings. A fairly heavy lubricating oil is helpful in securing a smooth appearance.
After the crater is sanded smooth, it is wiped clean and then polished with 600 grit wet/dry sandpaper until all the scratches are eliminated. Figure 2.

Figure 2. Sanding allows the layers to be revealed.
Here the oil is particularly helpful in achieving a smooth finish, and after polishing and final wiping, a coat of oil brings out the colors of the various layers by eliminating diffuse reflections of light at the polished surface. The layers stand out clearly as concentric rings unless the layering has been disturbed by alligatoring or weathering.
If the edges of the crater are sanded down to a very gradual slope, the paint layers are widened enough to be clearly visible with a portable light and 10X hand magnifier. The hand magnifier should be of the Hastings type : a lens built of three components for maximum correction and a wide, flat field.
The Coddington type , a cheaper two-component lens, is much less satisfactory. Bauch and Lomb makes both types in various powers.
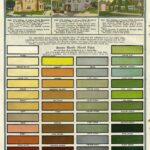
A commercial paint remover can be used to expose a 2 inch square of the particular layer you are focusing on to be easier to match to a paint chip or take a color reading.
Be aware that some layers can be primer or just dirt. You can match the color by hand using paint swatches or easily by using a Color Muse available online at a cost of about $60.
More Information:

Credits for the above information and images:
Credit: Morgan W. Phillips and Norman R. Weiss. “Some Notes on Paint Research and Reproduction.”Association for Preservation Technology Bulletin Vol. VII, No. 4, 1975: 14-16
Roger W. Moss and Gail Caskey Winkler. “Victorian Exterior Decoration” Henry Holt and Company 1987 p. 6
Jessica Parker Dockery. Pre-1850 Paint in Historic Properties – Treatment Options and Properties. Thesis 2005.


My significant historic Hume is located in belpre ohio. 45714 . Is there someone in this region that could do an analysis for my exterior paint colors . During the major Restoration in 2005 there were hints of the past but I was set on the colors that I would be using and did not study original color scheme from 1850 . Although very satisfied with the shades I chose , I am interested in furthering a study to get to the original before I paint next .
Hi – This is usually done by mail – they are listed in the article. Otherwise contact your state historic pres office for a listing of HP architects and consultants.